Heroics Guide: Tusken Army
Phase One: Liberate the City
Call out your speeder and proceed to the cantina in the heart of Mos Espa. Clear out the Cantina, and Phase One will begin. Cantina can be handled by a single group member, Commando, Bounty Hunter, Officer, or Dark/Light Jedi. Kav Goldor must not be killed during this phase; a battle droid will be useful in this case.
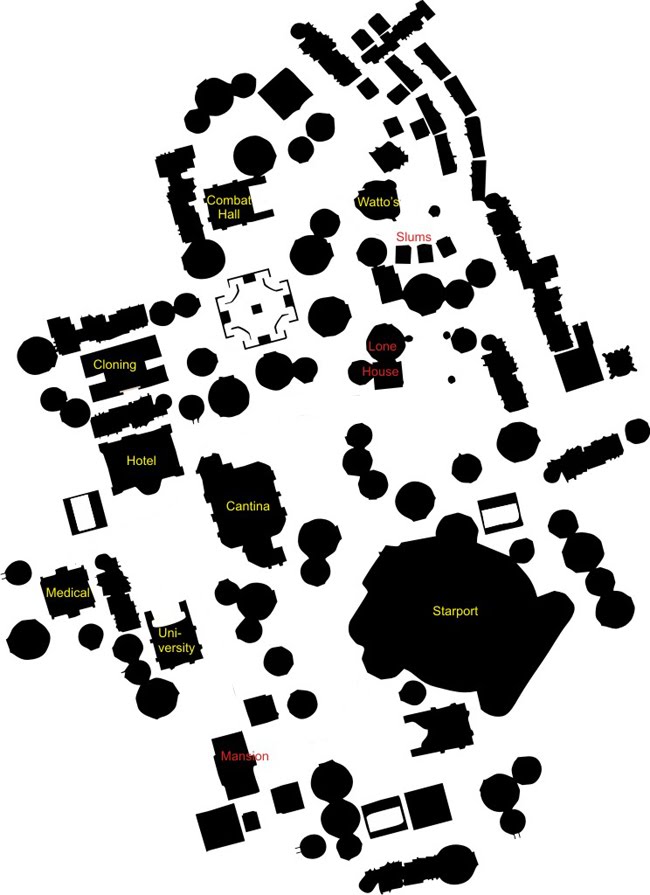
The rest of the group will go ahead and liberate the city following the path below:
Liberate Startport > Liberate University > Liberate Medical > Liberate Hotel > Liberate Cloner > Liberate Combat Hall > Liberate Watto’s
Phase Two: Secure the City
The second phase will begin once your journal has been updated and all of the perspective location waypoints have been activated on your screen. This is by far the most difficult part of the instance. Use the map provided above to familiarize yourself with the city structure and your assigned position.
For roles, try to achieve this kind of aggregation of professions:
- Mansion: 1x Commando, 1x GA, 1x Any
- Roaming: 1x Commando
- Lone/Slums (North): 1x Commando, 1x Any (Pref. DPS)
- Cantina/Cloner: 1x LSJ/Commando (tank gear)
- Sending: 1x Medic
You can, generally speaking, move around with these if you like but the general consensus is that maintaining at least 3 commandos pretty much gurantees a smooth run through the instance. It’s a good idea to send a commando to Mansion at least, if you’ve got more than that send them to Roam and North (in this order, meaning 2 Commandos = 1x Mansion, 1x Roam).
Sending experts
This is pretty much a straightforward task. Typically a medic does this as they’re the least DPS-able, rendering them practically useless at other locations. Sender has to respond to calls like a roamer does, no reason to patrol the city though – for best practice, stick around the Lone house as that’s the general area close to all the locations, especially the north side which has the most calls. The trip to mansion from lone might seem too long but as long as there’s heavy DPS stationed at mansion, you can afford this.
Calls are from these locations, from which you will be sending the experts:
Prioritize the target locations in this order.
- Mansion – 1. Startport, 2. University, 3. Med Center, 4. Cloning, 5. Watto’s, 6. Combat Hall
- Lone House – 1. Combat Hall, 2. Watto’s, 3. Cloner, 4. Med Center, 5. University, 6. Startport
- Slums – 1. Watto’s, 2. Combat Hall, 3. Cloner, 4. Med Center, 5. University, 6. Starport
Priorities are determined primarily by the distance between the called-on location and one of the target locations. Remember that when you speak with an expert and send them on their way, they are walking slowly to the destination. It takes time, and the longer they walk around the city, the more likely they will be killed by a tusken NPC.
You will most likely be called to more than one location because the calls are supposed to alternate. Prioritize the Combat Hall and Watto’s because these locations supply the entire city with friendly NPCs who will attack Tusken enemy NPCs. The order of the other locations is then unimportant. Cloner and University buff the entire group, so it’s nice to have them garrisoned sooner.
Mansion
As stated above, this area will be covered by three players; if you have a battle droid, call it out. Head to the garage area and kill 2 lines of Tuskens that spawn there – DO NOT LEAVE THE GARAGE UNTIL THE LINES ARE CLEARED, even if you have to wait a few seconds. This is absolutely crucial, if you don’t clear these 2 lines, you will most likely mess up the spawn timer making it almost impossible to alternate between the garage and the mansion in a timely fashion.
Your mission at the Mansion then is simple: keep the Warlord spawns from the garage, front and back of the Mansion in check. Experts will spawn on the second and third floors, as well as the rooftop.
Lone house
Take out any Tusken Flesh Hunter when they spawn. The experts will spawn in the basement.
Cloner
The group tank moves from the Cantina to Cloner’s left side. One group of Tusken, led by a Warlord, will spawn just outside of Cloner, on the border between the city and the desert. There will be no experts spawning here, so your task will be to keep all Tusken away from the entrance.
Slums house – behind Watto’s
When Tusken Flesh Hunters spawn, be cautious because the experts and citizens will spawn very close to the door.
Roamer
Roamer tasks should focus on the Tusken spawn at the cloner entrance, combat hall, and hotel, as well as providing assistance whenever someone calls for it. In addition, a group of Tusken/Warlords is approaching from the north of Watto. Notify the Roamer whenever a citizen or expert is in trouble for the rest of the group.
Phase Three: Defeat the Tusken King
Gather around the Spawn Egg near the Cantina, recharge your medic/officer buffs, and brace yourself for the final Tusken assault. Allow the Mos Espa Militia to engage and quickly finish off the first wave of 5 Tusken Warlords. Allow the Mos Espa Militia to engage first and ignore the Guards, focusing on the King during the final wave. Continue to attack the King until he falls.