Heroics Guide: Imperial Star Destroyer
This instance differs from the others as you can’t really enter using the standard approach but a pilot has to get you there. An ace pilot is recommended as you will receive a buff (2 types of buff, you get 1 from a smuggler pilot, the other from any other pilot) but you can also enter using the yacht.
Phase One
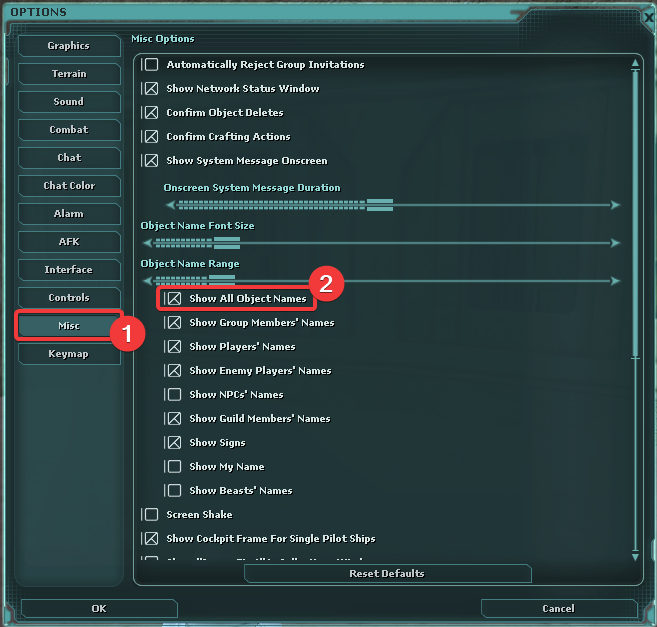
You will spawn in the main hangar bay where the first boss fight takes place. Remember to buff up and store your familiars before proceeding. Also, don’t forget to turn all object names setting in the options! This will be helpful so you can see the spawning grenades on the floor before they blow up so you have time to avoid the splash damage.
When you’re ready, start the fight by using the terminal on the left side of the hangar bay, near the door. The boss and his grenadiers will spawn and slowly walk to their positions, with Krix in the center and the grenadiers on the sidelines along the hangar bay.
Tank will remain with Krix. Start killing the Grenadiers from left to right. You’ll need to move around while taking out the Grenadiers in this one. Similar approach with Krix, keep attacking Krix while moving – there will be fire across the room, so don’t stand still.
Phase Two
Proceed through the door that’s right next to the terminal. Find the officer NPC in the hallway and talk to him. Stay in the intersecting hallway and focus fire on the enemy NPC that spawn randomly in the side rooms and/or in the hangar bay (TIP: pet pulling the NPCs from the hangar bay to the hallway is much easier and faster). This phase ends with killing the Stormtrooper Squad Leader NPC – this one spawns either in the hallways or the hangar bay itself after you’ve cleared the rooms.
Phase Three
Continue to the next room by going all the way to the other end of the hallway accross from where you entered. Kill any enemy NPCs you come across along the way. When you enter the larger room, keep in mind that there are three different spawns of dark troopers. Because it is difficult to stack these NPCs, divide your group members to watch all three spawns and kill NPCs as needed simultaneously.
Phase Four
After you’ve killed all the NPCs, you will notice that the only closed door until up to this point are now open. Go through them, move through another hangar bay until you get to a room with an Imperial officer hologram. Notice the elevator to your left, a door to your right and another door in front of you. Speak to the hologram to open the door in front of you.
This next hallway is filled with semi-grenadier NPCs that you have to kill as soon as possible. Failing to do so will result in all nearby players receiving a hefty load of damage from the grenades that go off when the NPCs reach a player. Another boss awaits you at the end of this hallways. Tank will focus on Cpt. Prat while the rest kill the accompanying droids as soon as possible.
After you’ve cleared the room, one member has to continue to the next door and talk with the engineer NPC there. Everyone run back to the room where you killed the grenadiers earlier and approach the elevator. Wait for the engineer NPC to arrive and once the elevator has been fixed, click on the button to warp to the next area.
Phase Five
This phase can be done in 2 ways. Everyone has their own way of doing this, but this is the general recipe so keep it in mind.
Prefferable: “Dilly-dally”
This one is the most easy to understand and follow. Simply go through the rooms and clear them off any enemy NPCs. Easy enough, right? Well yeah, but keep in mind that you can still get yourself or your entire group killed. Try not to stand near the boarder NPCs as they will hit you HARD if you’re too close to them. Let the tank pull them to their position and hold them there, stand as far as you possibly can and put them down. Focus on one pull at a time too.
Keep in mind that one of the static spawns will spawn 3 boarders sequentially. – Meaning a boarder NPC will spawn and another one a few moments later after you’ve killed the previous one. Continue like this up until you come to a circular intersection.
NOTE: Pay attention to the map below:
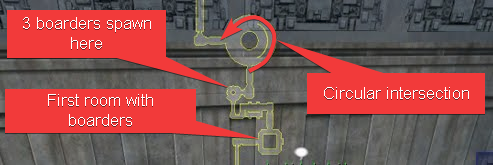
Once you are ready to move on through the circular intersection (as depicted on the picture) HUG the RIGHT wall and run towards the next hallway. DO NOT AGGRO the enginner standing there!
You will arrive to a big engineering room. Kill everyone in it, let the quest update and run back to the elevator. It doesn’t matter if you aggro the engineer in the circular intersection at this point, just continue running. Once you’re warped by the elevator, continue to the now open room in front of you. You can see another Imperial Office boss. Kill him.
For the pros: Run like hell
UPDATE: As of 2023, this method is no longer possible as since the last GMF, the devs decided to make Chief Olum attackable and walk all the way from the elevator to the engine room. This means, that the entire path has to be cleared first before Olum makes for his “Dilly-dally” to the engine room.
To make this process faster, you can gather all the enemies from the rooms and bring them to the main circular “donut” room. Preferably using a pet pull. Begin by dealing with the rooms on the way from the elevator to the donut room. These rooms already have some enemies, and more will appear as you defeat them. It’s crucial to make sure there are no hostile enemies around because even one of them can wreck our Chief.
Once you’ve cleared these rooms, you can send a spy or another player to go to the engine room and bring the enemies from there into the donut room. If possible, use a pet to help with this task. Keep in mind that the enemies inside the engine room will only appear after a player reaches it.
Alternative way is to run through to the engineering room. One Jedi or Spy will take all the aggro while everyone follow (nobody can aggro anything or this fails, do not use heals or anything that can pull the npcs really, just follow). Cloak once you reach the engineering room to lose all the aggro and the whole group then clears the room. Run back to the elevator using the same technique.
Phase Six
Once the last boss has been killed, simply use the elevator behind him and run through the hallways until you arrive at the bridge. You will find the Grand Admiral there, he’s very easy to kill so just do it and you’re done with the instance, huray!